![Yonder_logo (1).png]](https://support.tomis.tech/hs-fs/hubfs/Yonder_logo%20(1).png?height=50&name=Yonder_logo%20(1).png)
Website Sync is one of the most-requested features we've built — and for good reason. It pulls content from pages on your website, generates ready-to-use responses from them, and (if you choose) keeps those responses in sync automatically as your website changes. For information that shifts often — schedules, snow reports, seasonal hours — it removes the manual update work entirely.
This article covers what Website Sync does, when it works best, and how to set it up.
Note: Website Sync is currently rolled out to selected operators. To request access, email support@yonderhq.com and the Yonder team will enable it on your account.
Website Sync Demo - Watch Video

What Website Sync Does
Website Sync works in two stages — an initial setup, and ongoing maintenance.
1. Initial setup. You add the pages you want Yonder to read from your website. Yonder scrapes the content and turns each page into a set of suggested responses, ready for you to review and approve.
2. Ongoing maintenance. Once a response is approved, you decide whether it should be Synced (auto-updated when the source page changes) or Manual (locked in place, edited only by you). Synced responses keep themselves current. Manual responses don't change unless you change them.
When to Use Auto-Sync (and When Not To)
The magic of Website Sync is automation — but like any good automation, it works best when pointed at the right things. We recommend using Auto-Sync for content that changes often and where your website is already the source of truth.
Good fits for Auto-Sync:
- Daily weather reports
- Seasonal schedules and operating hours
- Pricing pages that update regularly
- Tour timetables and departure times
- Event listings and upcoming events pages
- Promotional content with a defined run time
For these, Auto-Sync genuinely is set-and-forget. Update your website, and the chatbot updates itself.
Better kept as Manual responses:
- Policies like cancellation, refund, weather, and safety
- Information that isn't on your website
- Anything you've already fine-tuned through training
The simplest rule: if you'd update your website when something changes, it's a great candidate for Auto-Sync. If you'd update the chatbot but not the website, keep it Manual.
How to Set Up Website Sync
Step 1: Open the Website Sync tab
In your Yonder dashboard, go to Chatbot → Content, then click the Website Sync tab.
Step 2: Add pages from your website
Click Add Pages and enter your website URL. Yonder will pull your sitemap so you can see every available page. A few tips for choosing pages:
- Start small. Five to ten pages is plenty for an initial setup. You can always add more later.
- Pick pages with clear, structured content — FAQs, schedules, product pages, pricing pages.
- Avoid pages with mostly visual content or marketing copy that doesn't answer customer questions.
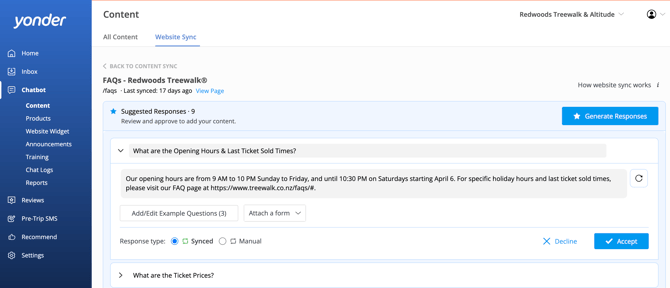
Step 3: Review the suggested responses
Once your pages are added, Yonder will automatically read each one and generate a set of suggested responses for you to review.
For each suggested response, you can:
- Edit the title, response text, and example questions
- Attach a form if relevant (e.g. Check Availability)
- Regenerate the response with a follow-up prompt — for example, "add more detail" or "include the pricing breakdown"
- Choose the response type: Synced (Auto-Sync) or Manual (locked)
- Click Approve to add it to your chatbot, or Decline to discard it
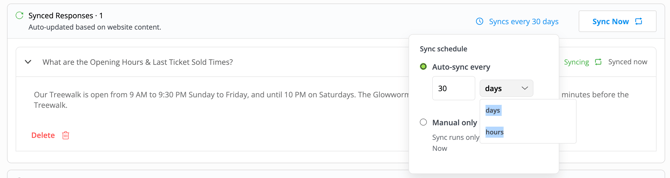
Step 4: Set your sync schedule for synced responses
Once you've approved responses as Synced, you can decide how often they refresh. Scroll down to the Synced Responses section on the page and use the schedule dropdown to choose:
- Auto-sync every X hours — for fast-changing content like daily snow or weather reports
- Auto-sync every X days — for weekly or monthly updates like seasonal hours
- Manual only — sync runs only when you click Sync Now
You can also click Sync Now at any time to refresh manually.
Synced vs Manual Responses
Once a response is approved, it lives in one of two sections on each page:
Synced Responses — Auto-updated based on website content. The title and response text are locked, because the AI is managing them based on the source page. To edit a Synced response, you must switch it to Manual.
Manual Responses — Not synced and fully editable by you. Behaves the same as any other chatbot response. Use this for anything you want to control directly.
Frequently Asked Questions
Can I sync all my chatbot content?
You can, but we don't recommend it. Auto-Sync is at its best for information that changes often and is already on your website — schedules, snow reports, event listings, pricing, seasonal hours. For brand voice, policies, and anything where exact wording matters, Manual responses give you more control.
Will anything go live without me seeing it first?
No. Suggested responses always need to be reviewed and approved before they reach customers, and the default for any approved response is Manual. Synced is opt-in, response by response.
What happens to my existing chatbot content?
Nothing changes. Website Sync adds new responses alongside what you've already built. Your existing FAQs and trained responses stay exactly as they are.
Can I edit a Synced response?
Not directly. Synced responses are locked because the AI is managing them. To edit one, switch it to Manual first. You can switch it back to Synced afterwards, but doing so will overwrite your edit on the next sync.
What if Auto-Sync produces a response I don't like?
Switch it to Manual and edit it directly. If you want to keep it synced but change the approach, you can also use the Regenerate prompt or update the special instructions for that page and re-sync.
Have other questions? Feel free to reach out to us at support@yonderhq.com.