![Yonder_logo (1).png]](https://support.tomis.tech/hs-fs/hubfs/Yonder_logo%20(1).png?height=50&name=Yonder_logo%20(1).png)
Quizzes are a powerful way to learn more about your customers and guide them towards the ideal experience. Once someone completes your interactive quiz, you can use their answers to show tailored recommendations. This article explains how to set up these recommendations.
For a quick overview of the quiz feature, check out our Quick Guide to Setting Up Your Interactive Quiz.
How to Create Quiz Recommendations
Step 1: Create Your Quiz
-
Log in to your Yonder account.
-
Go to the Recommend tab and click Create Quiz.
-
Add your quiz questions. Need help? See our Setting Up Quiz Questions guide.
-
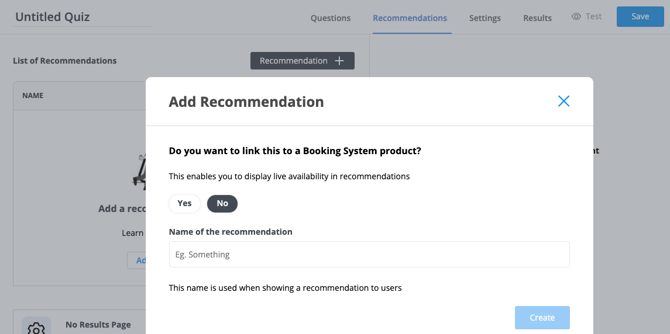
Click the Recommends tab, then click + Recommendation.
-
Choose whether to link the recommendation to a product in your Booking System:
-
Yes: Pulls the product information from your booking system, so you can switch on Availability for this recommendation and let customers check dates and book.
-
No: Creates a manual recommendation. None of the details pull through automatically, so you'll enter the name, image, description, and other details yourself
-
-
Click Create to continue.
Step 2: Add Recommendation Details
For each recommendation, add details that help customers understand what’s on offer:
-
Image: Upload a visual to represent the experience. Keep images under 500KB.
-
Description: In 1–2 sentences, explain why this recommendation suits the customer.
-
Additional Info (optional): Share extra details such as schedules, duration, or restrictions.
-
URL to learn more: Add a direct booking link (either to your product page or booking system).
- Availability: Toggle this on to let customers check dates directly from the recommendation.
-
Click Save to finish.
Note: If you linked a product in Step 1, its information pulls through automatically and the product is auto-selected. If you created a manual recommendation, search for and attach a product from your booking system instead.
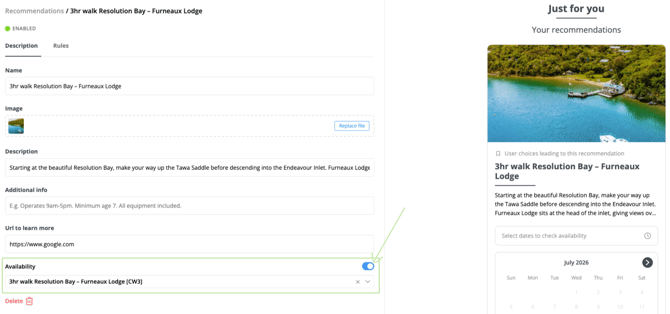
Once Availability is on, customers see a Select dates to check availability field on the recommendation. They can browse a two-week window and pick their dates.
Step 3: Set Up Recommendation Rules
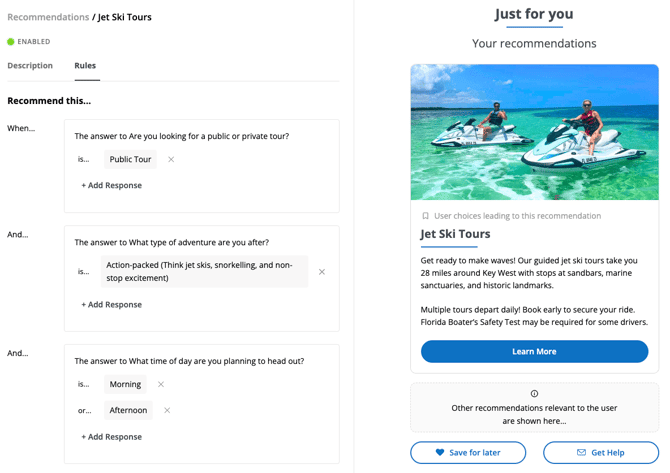
Rules tell the platform which recommendation to show based on the customer’s answers.
-
Go to the Rules tab.
-
Click Add Question and choose one of your quiz questions.
-
Click Add Response to select the answer(s) that should trigger the recommendation.
-
Repeat this for any other relevant questions and responses.
-
Click Save.
Step 4: Create a ‘No Results’ Page
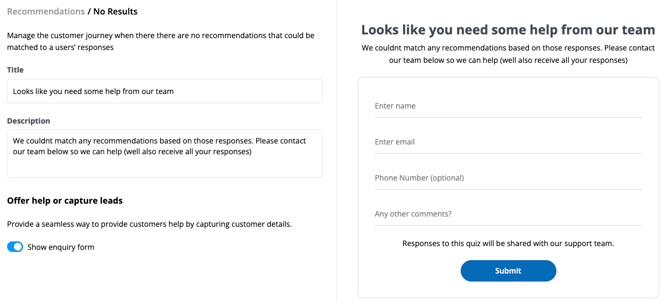
Let customers know what to do if no recommendations match their answers.
-
In the Recommendations tab, scroll to the bottom and click Edit No Results Page.
-
Update the title and message (e.g. “Didn’t find what you’re after? Contact our team to chat through options!”).
-
Optionally toggle on the Enquiry Form so customers can send you a message directly.
-
Click Save.
Frequently Asked Questions
Can we connect recommendations to our booking system to show live availability?
Yes! Toggle on Availability for any recommendation and link it to an active product. Customers can then pick their dates and times and click straight through to book.
Can I remove a recommendation?
Yes, just click into the recommendation and then click the red Delete button (trashcan icon).
What email does the enquiry form go to?
Enquiry form submissions go to the account email listed in your Business Details.
How many recommendations can I add?
You can add as many as you like - there’s no limit.
What happens if a customer doesn’t complete the quiz?
If a customer exits early, no recommendation will be shown or recorded.
Have other questions? Contact support@yonderhq.com.