![Yonder_logo (1).png]](https://support.tomis.tech/hs-fs/hubfs/Yonder_logo%20(1).png?height=50&name=Yonder_logo%20(1).png)
If your business uses Singenuity, integrating it with Yonder will save you time and enhance customer engagement by automating review requests. This guide will walk you through the simple setup process to sync booking data and send automated surveys.
Step-by-Step Integration Guide
Step 1: Contact Singenuity Support
Email your Singenuity representative or support team and request access to the OTA API.
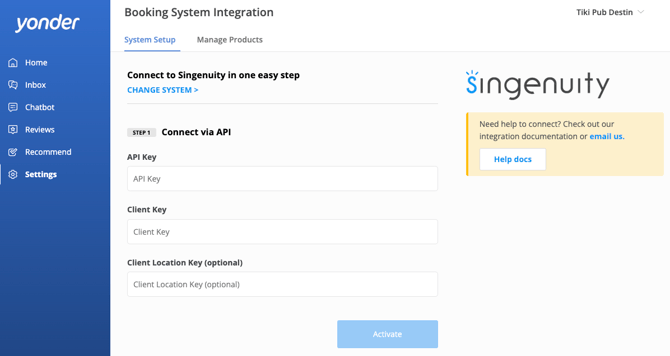
Request the following credentials:
- API Key
- Client Key
- Client Location Key (this may not be available for all accounts)
- Supplier ID
Step 2: Enter Your Credentials in Yonder
- In Yonder, navigate to Settings > Booking System > Singenuity
- Enter your Singenuity credentials from above
- Optional: Tick “Use waiver contacts for surveys” to include waiver-only participants in your data sync
- Click Activate to finalise the integration
Benefits of Integrating Singenuity
Automated Review Requests
Once connected, go to Manage Products, where all your Singenuity items will appear. Select which products should receive automated review requests. Make sure the Auto-send feature is enabled in Survey Settings.
If you have enabled waiver contacts, review requests can also be sent to waiver signers, helping you capture feedback from more participants and increase overall review volume.
📘 Read our Quick Guide to Setting Up Customer Review Requests and Surveys.
Chatbot Live Availability
You can enable the chatbot live availability feature in your Products tab. This allows customers to check real-time availability for their preferred date and time before proceeding with their booking.
With dynamic links, selections made in the chatbot are automatically passed into your booking system—creating a smoother, faster booking experience with no manual setup required.
📘Learn about Adding Live Availability to Your Chatbot.
Pre-Trip SMS Messages
Communicate with guests before their experience using automated SMS reminders.
Pre-Trip SMS messages are sent ahead of a booking with key details and helpful information, ensuring guests feel prepared and reducing last-minute confusion. Messages are triggered based on the booking time and can be customised to match your products and customer experience.
Note: Pre-Trip SMS is currently available for US and Canada (+1) numbers only.
📘Learn about Pre-Trip SMS Messages.
Frequently Asked Questions
Do I need to contact Singenuity to set this up?
Yes, you’ll need to request access to the OTA API and obtain the required credentials from Singenuity before completing setup in Yonder.
What is the Singenuity waiver signer option?
The waiver signer option allows you to include waiver-only participants—not just the primary booking contact. When enabled, these participants can receive Pre-Trip SMS messages and review requests, helping you gather more feedback and increase your overall review volume.
Does Yonder sync all my Singenuity bookings automatically?
Yes, once integrated, your booking data will sync with Yonder, allowing automated survey requests to be sent after customer experiences.
What if I don’t have a Client Location Key?
Not all Singenuity accounts require one. If you don’t have it, simply leave that field blank.
What should I do if some of my products are missing from Yonder?
If any Singenuity products are missing after integration, contact support@yonderhq.com.
How long does it take for the integration to activate?
The integration is usually immediate, but allow a few minutes for data to sync.
Can I use only surveys without live availability?
Yes, you can choose to enable only survey and pre-trip messaging functionality by entering just the API Key, Client Key, and Client Location Key (if applicable).
Have other questions? Contact support@yonderhq.com.