![Yonder_logo (1).png]](https://support.tomis.tech/hs-fs/hubfs/Yonder_logo%20(1).png?height=50&name=Yonder_logo%20(1).png)
Yonder enables you to send personalised email surveys to your customers without the need for system integration. This article explains the three manual methods available for sending surveys:
- Adding recipients individually
- Importing a CSV file
- Copying and pasting data directly (comma or tab-separated)
- Sharing a Public Link or QR Code
If you’d prefer automated survey sending, check whether your booking system supports integration on our Integrations Page. If your system isn’t listed, this guide will help you upload and send surveys manually.
Steps to Manually Send Surveys
Log in to Yonder, navigate to the Reviews tab and click Send Requests.
Option 1: Adding Recipients Individually
Best For: Sending surveys to a limited number of recipients or sending additional surveys for unlisted events not in your booking system.
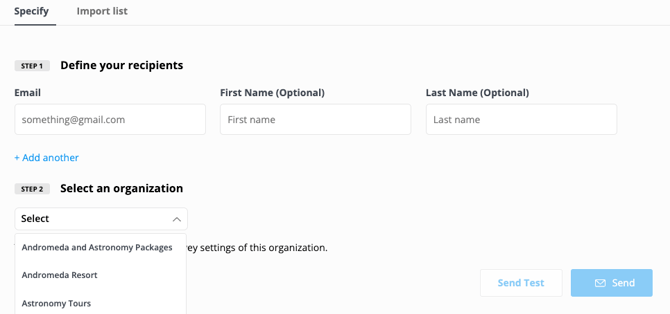
- Select the Specify tab.
- Enter the recipient's email (required) and their first and last names (optional).
- Including names allows you to use placeholders like [Firstname] and [Lastname] in your survey emails for a personalised message.
- If the name fields are left blank, the placeholders will remain empty with no default text.
- When ready, click Send or Send Test to preview the survey.
.gif)
Option 2: Uploading and Sending Surveys in Bulk
Best For: Sending large batches of surveys at once and efficiently processing data exported from a booking system, spreadsheet, or CRM.
Step 1: Import a List of Recipients
- Select the Import List tab.
- Upload a CSV file by dragging and dropping it, or paste your data into the input box (supports comma or tab-separated values).
Step 2: Map Your Data
- On the next page, map the columns of your file to the required fields: email, first name, and last name.
- If your file includes headers (e.g., "Email", "Name"), toggle My data has headers to ON. This ensures the first row is skipped. If the first row contains customer data, toggle this setting OFF.
Step 3: Review and Send
- Check the status indicators in the left column for any rows with invalid or missing email addresses. Rows with invalid emails will be ignored automatically.
- Once reviewed, click Send.

Important Things to Note
Organisations
If you have Organisations enabled, your surveys will include custom branding for each organisation (e.g., business name, logo, and review site links).
For manual sends, you’ll need to specify which organisation the surveys are for. Each manual send can only be tied to one organisation at a time.
📘 Learn more: Managing Multiple Organisations
Test Surveys
Test surveys allow you to preview the customer experience. Responses from test surveys won’t appear in your dashboard, won’t impact your stats, and won’t count towards your monthly limits.
Survey Limits
To prevent over-surveying your customers, adjust the frequency threshold in your Send Settings. This ensures customers aren’t sent surveys too often.
Yonder makes it simple to send surveys manually, whether it’s a one-off send to a single customer or a bulk upload of data. Use the individual recipient option for small-scale sends or explore the CSV and table import options for bulk sending. With flexibility to customise and review your data, you can ensure your surveys are accurate, branded, and sent to the right people.
Frequently Asked Questions
How can I test the survey before sending it to customers?
Use the Send Test option to preview the survey. Responses to test surveys won’t appear in your dashboard or affect your survey limits.
Can I schedule surveys to be sent at a later time?
Currently, Yonder does not support scheduling surveys for a later send time. All surveys are sent immediately.
Is there a limit to the number of surveys I can send per month?
Your survey send limits depend on your Yonder plan. Check your account settings or contact support for details.
Can I collect reviews from guests without an email address?
Yes. The Public Link gives you a permanent survey URL and downloadable QR code that any guest can use on their own device — no email required. It's ideal for walk-ins, OTA bookings, and third-party reservations.
Have other questions? Contact support@yonderhq.com.