![Yonder_logo (1).png]](https://support.tomis.tech/hs-fs/hubfs/Yonder_logo%20(1).png?height=50&name=Yonder_logo%20(1).png)
Engage your customers by guiding them through a personalised quiz experience! Ask a series of targeted questions, educate them along the way, and provide tailored recommendations based on their responses. Customers can save their recommendations via email or send an enquiry directly to you. You can embed the quiz on your website or link to a Yonder-hosted page.
How to Create Interactive Quizzes
Quizzes help customers find the best experience based on their preferences. Here's how to set one up:
1. Plan Your Quiz - Outline the questions and recommendations.
2. Add Questions & Answers – Add questions and define answer options.
3. Define Question Flow - Set up the order of questions based on user responses.
4. Add Recommendations – Select or create products/experiences as end results.
5. Create Recommendation Rules – Set up rules to determine which results appear.
6. Adjust Settings & Install Quiz – Customise the quiz and add it to your site.
7. View Results – Analyse customer responses and track engagement.
1. Plan Your Quiz (Question Mapping)
Before creating your quiz, map out:
- Questions: Identify what key information will help determine the best experience for your customer? E.g., Who are you travelling with? What type of experience are you looking for? How much time do you have? What is your budget? What is your adrenaline level?
- Answers: Include answers that guide users towards the best recommendation.
- Recommendations: Identify which products or experiences should be suggested based on your customers responses.
Here's an example of a question mapping flowchart: Yonder Quiz Mapping | Take The Quiz
.png?width=670&height=473&name=Yonder%20Quiz%20Mapping%20Example%20(1).png)
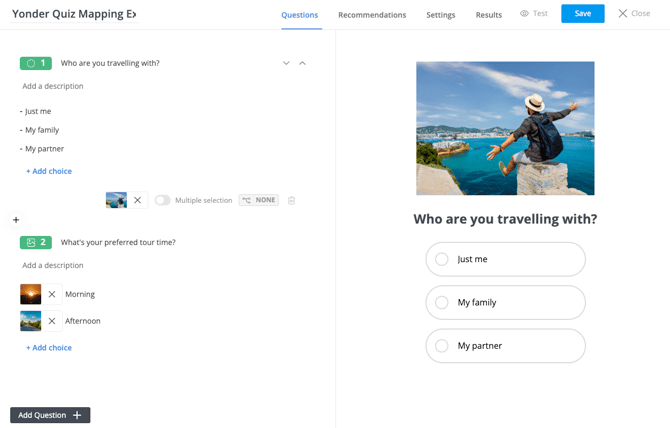
2. Add Questions & Answers
Structure your quiz by adding relevant questions and answer choices.
- Log in to your Yonder account, navigate to the Recommend tab and click Create Quiz.
- Click Add Question and choose from the following question types: Explain, choice, picture choice, email, name, and date.
- Customise each question’s title, description, image, and answer choices.
- Click Save after each question is added.
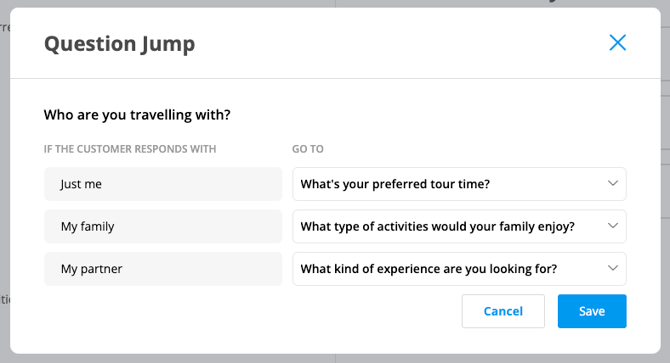
3. Define Question Flow
After adding all your questions, set up the quiz flow to ensure customers are guided through a logical journey.
- For each question, click the logic button (labelled 'None').
- Use your question mapping sheet to determine how each answer should guide the user to the next question.
- Repeat this for all questions and click Save when done.
📘 Learn more: Setting Up Quiz Questions
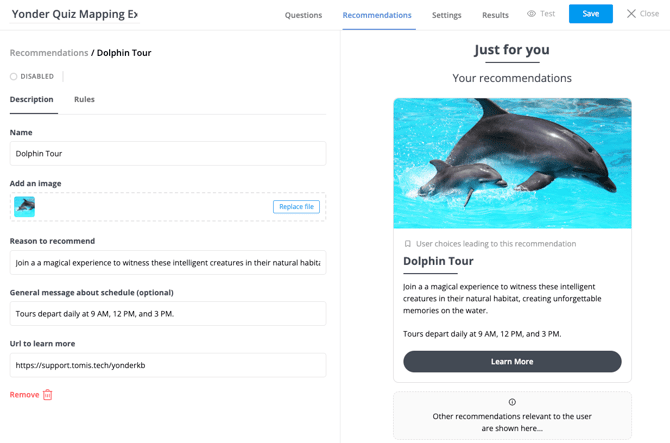
3. Add Recommendations
Define which products or experiences should be recommended based on user answers.
- Go to the Recommendations tab and click Add Recommendation.
- Choose an existing product from your reservation system (if integrated) or create a new recommendation.
- Enter the following recommendation details:
- Product Name
- Description / Reason for Recommendation
- Additional Info
- URL to Learn More (e.g., product webpage or booking link)
- Product Availability
- Preview the recommendation on the right-hand side and click Save.
📘 Learn more: Setting Up Quiz Recommendations
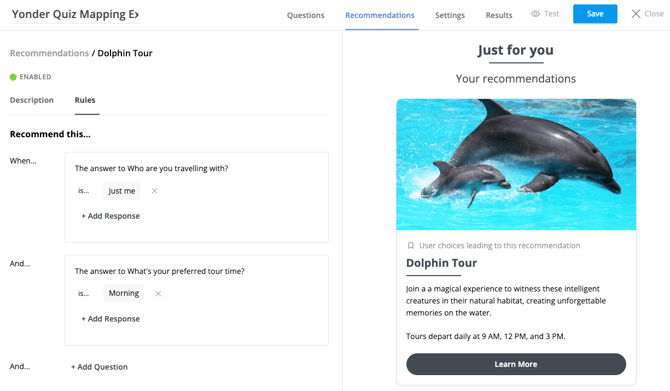
4. Create Recommendation Rules
Define how recommendations are triggered based on user answers. This ensures each customer receives the most relevant product or experience.
- Open the Rules tab in the Recommendations section.
- Use your quiz mapping sheet to assign answers to recommendations by defining logical conditions.
- Select the relevant questions and answers that should trigger each recommendation.
- Repeat this process for all recommendations.
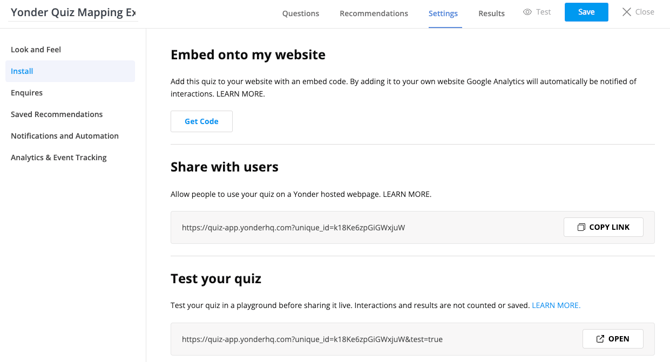
5. Adjust Settings & Install Quiz
Customise your quiz to match your brand and choose how you want to display it on your website or in your ChatBot.
1. Update Quiz Settings
- Go to the Settings tab and adjust the following:
- Look & Feel - Customise the quiz button colours to align with your branding.
- Inquiries - Enable an enquiry button on the recommendations page so users can easily contact your team.
- Saved Recommendations - Allow users to email themselves their recommendations, making it easy to revisit and book later.
- Notifications & Automations - If enquiries or saved recommendations are enabled, specify who should receive notifications.
2. Install Your Quiz
- Choose how to display your quiz:
- Website Embed Code – Copy and paste the provided code to embed the quiz directly on your website.
- External Page URL – Use a Yonder-hosted quiz page and share the link in ChatBot responses or external communications.
📘 Learn more: Testing and Installing Your Quiz
6. View Results
Track your quiz’s performance and user responses.
- Click the Results tab to view:
- The number of completed quizzes (within a selected timeframe).
- Email leads submitted.
- The most common customer responses.
📘 Learn more: Viewing Quiz Results

Frequently Asked Questions
How many quizzes can I create?
You can create an unlimited number of quizzes! There are no restrictions on how many you have live at once.
Where can I add the quiz hosted-page URL?
You can add the quiz link to any ChatBot FAQ response, welcome button, or pop-up message - wherever it fits best in your customer journey.
Can I collect customer emails through the quiz?
Yes! Use the Email Question Type to capture customer emails for follow-ups.
Can I edit a quiz after it’s published?
Yes, you can modify questions, recommendations, and rules at any time.
Can I track which recommendations perform best?
Yes, the Results tab provides insights into popular answers and recommended experiences.
Can I duplicate a quiz?
Currently, no. You'll need to create new quizzes from scratch.
Have other questions? Contact support@yonderhq.com.